Tabs

Showing posts with label Gifts. Show all posts

August 10, 2012

Project: A Quilt for Baby Taylor


Several weeks ago I shared with excitement a stack of beautiful quilting squares I had waiting to be transformed into something even more beautiful:


  Then I posted photos of my favourite part: quilting by hand with my Oma:


Any now, without further ado, here is Baby Taylor's first handmade quilt.  I wish I could show you how perfectly it matches the nursery.  My sister-in-law has phenomenal decorating taste!


Pretty blue buttons.  :)


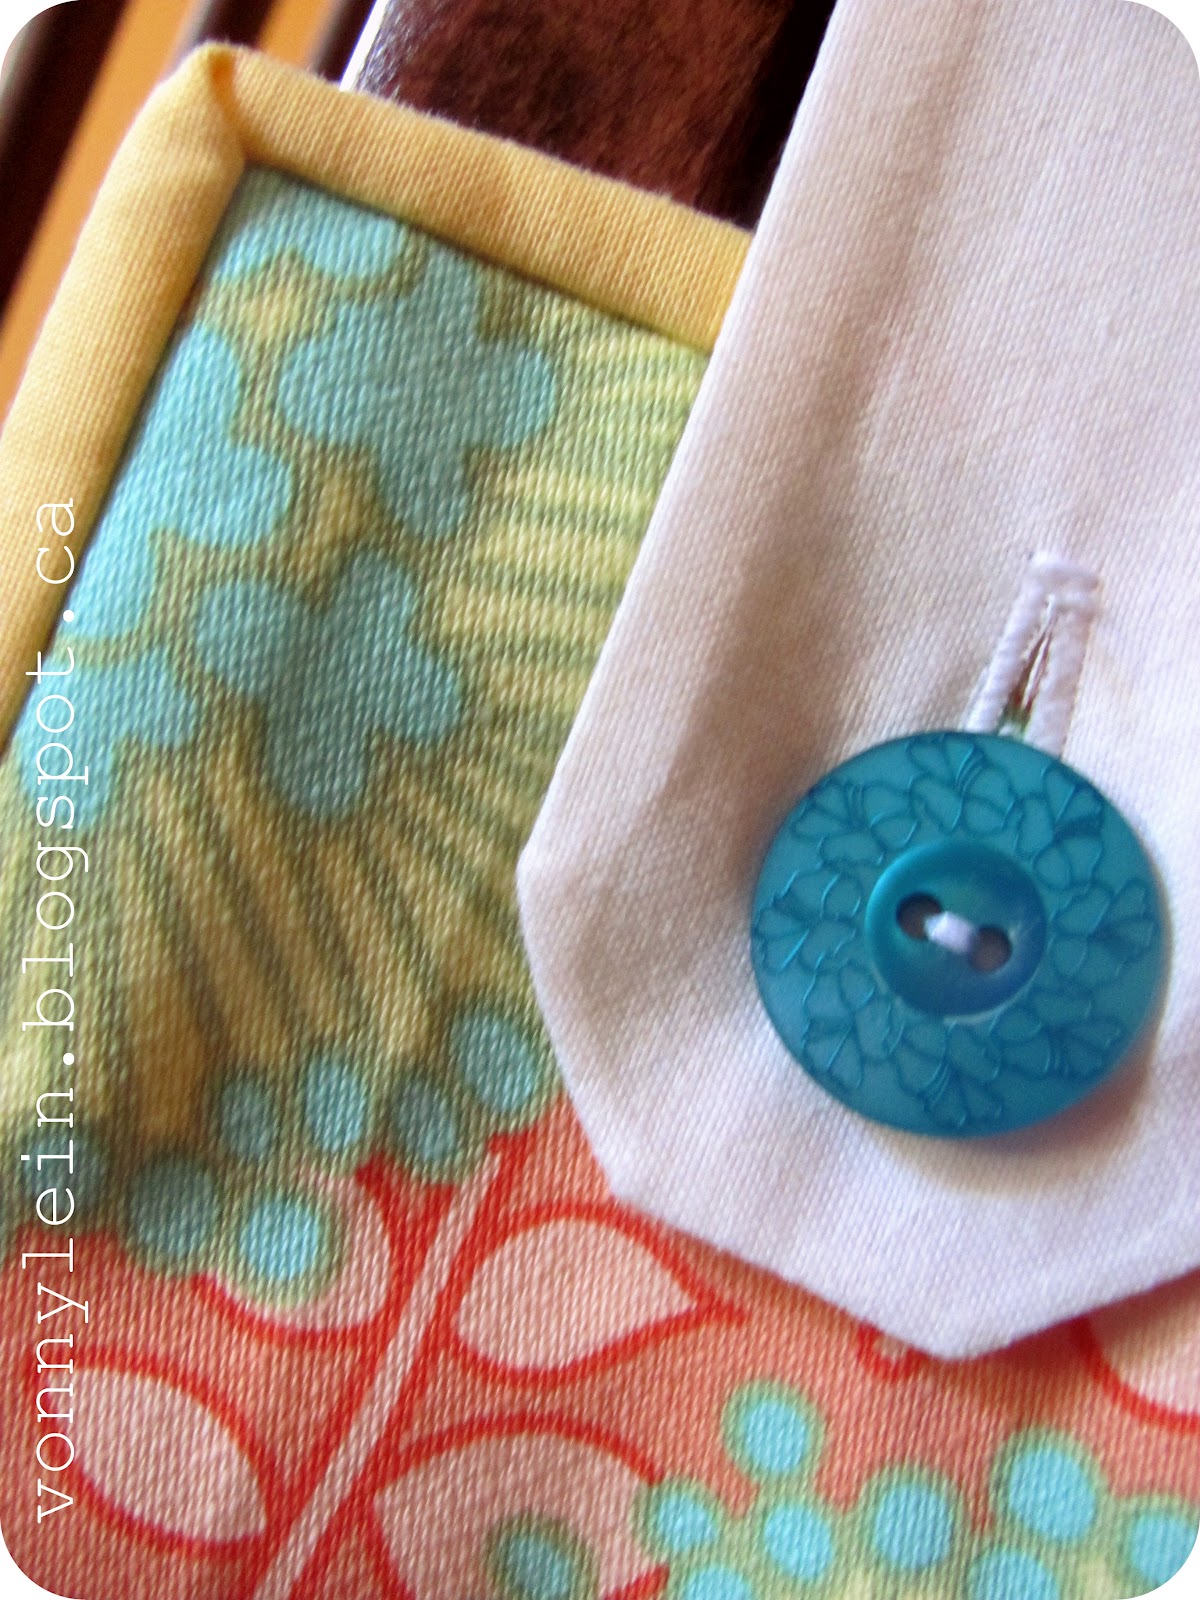
My first attempt at mitered corners.  A success...hurrah!


The 'girliness' of this quilt looked so at home in Baby J's room, that I almost had trouble gifting it.  
I'll just have to make another!  You never know....  ;)

Happy Sewing!


I plan to link up to these great blogs:

June 22, 2012

A Stack of Pretty Colours

I have the honour of sewing a decorative quilt for my sister-in-law's second baby girl.  

During Baby J's nap today (which was nearly FOUR hours long!), I was able to cut all 63 of these beautifully coloured squares.  My sister-in-law sure knows how to pick 'em!  Cutting is not at all my favourite part of any sewing project; however, the end result of a nice, neat stack of quilting squares is satisfying enough for me.

More to come over the next week as I piece these pretties together, and my Oma teaches me how to hand-stitch (!!!!) the quilt.  

(Sidenote: the yellow is definitely my favourite!)


Happy Sewing!


June 11, 2012

Gift: Notebook Cover

This is a gift that I put together for our friend's daughter.  She turned 6 just yesterday, and I remember my love for writing (and notebooks) beginning around that age.  I still have all my little diaries, full of nonsensical thoughts, describing friends, feelings and the weather.  Many girls in her kindergarten class are currently on a writing kick, and apparently, so is she!  Cute notebook cover - you have a purpose.  May you be well used!  :)

{Elastic & Button Closure}

{A Little Spot for Stickers}


{Personalized}


Happy Sewing!


I plan to link up to these great blogs:


February 2, 2012

Princess Cape Tutorial

In light of beginning "The 'Green Clothing' Challenge," I thought it would be fun to share a tutorial on the Princess Cape I made for my niece from recycled fabrics.  My husband and I both love to make homemade gifts (for example, our Christmas gifts found here and here).  Hubby creates things out of leftover wood from other home projects, while I prefer to sew!
Our niece is a little princess.  She loves everything pink and sparkly.  So when my friend (who is doing the challenge with me) came home with 3 boxes of vintage fabric for $30, I was ecstatic to be able to pick through with her!  

I left with a score of shiny pink satin fabric.  Perfect for a princess.  Match that with some scraps of white, sparkly gold cotton that came from who-knows-where, I had a great combination to create a cape fit for a princess.

For this project I used the following materials:
  • Computer & Printer
  • Sewing machine
  • Scissors
  • Pins
  • Coordinating thread
  • Fusible webbing (e.g. "Wonder Under" or "Heat N Bond")
  • Fabric for cape: 31 in. x 31.5 in. (based on height of the child) - 31 inches is my WIDTH
  • Two strips of fabric for trim: 20 in. x 3.5 in., 31.5 in. x 3.5 in.
  • Scrap fabric for the letter applique
  • Small square of Velcro

Part A:
  1. Print your desired letter applique as a mirror image.  Cut around the letter and glue it to the paper side of your double-sided fabric adhesive (e.g. Wonder Under).  
  2. Iron your letter onto the wrong side of your fabric.  I used glittery white fabric (the stripes underneath are from my ironing board).
  3. Cut out your letter along the outline.  Leave the paper backing on for now.
Part B:
  1. Cut a piece of fabric for your cape.  Mine measures 31 in x 31.5 in.
  2. Gather the top of your fabric using a basting stitch (i.e. the longest stitch on your machine), sewing approximately 1/4 inch from the edge.  Now, holding the bottom thread, pull the top thread to gather the fabric so that it measures 12 inches in length.  
    • Next, cut a strip of fabric for the collar.  Here mine measures 20 in x 3.5 in.
  3. Lining up the centre of the collar fabric strip to the centre of the gathered edge of your fabric, pin your strip to the cape, right sides together.  
  4. Since my fabric was very slippery to work with, I used a LOT of pins.  This is not necessary.  :)
  5. (Showing the other side of the gather).
  6. Sew the two pieces of fabric together; try to avoid sewing over your gathering stitches.  Carefully pull out your gathering threads.
Part C:

  1. Iron the collar upward, away from the cape.  Also iron all of the edges 1/4 inch inward.
  2. Fold the collar over in half and iron.  Pin in place if desired.
  3. Topstitch (1/8 inch) around the three open sides.

Part D:

  1. This part is very similar to the collar.  Centre the strip of fabric trim on the bottom of the cape, and pin in place with right sides together.  Sew the two pieces together.
  2. Follow steps 1-3 from Part C, ironing the edges, folding in half, and topstitching along the open edges.

Part E:

I apologize, I did not take pictures of these last few steps.  I will try to be as descriptive as I can.
  1. You now want to sew two squares of Velcro to the collar (one square of 'hoops' and the other of 'loops').  I simply straight stitched around each square.  When you are doing this, make sure that the Velcro pieces are placed in such a way that they connect when you 'close' the collar!
  2. And now for the last finishing touch....ironing on your letter applique!  Iron your letter near the centre of the cape (you can see in the photo on the right below that I could have placed it higher).  Follow the instructions on your fusible webbing when doing this.  If you have the type that does not need to be sewn, than you are finished!  If you have 'sewable' webbing, you will want to do a zigzag stitch around the edge of your letter to secure it in place.


Finally, admire your beautiful Princess Cape!


Happy Sewing!


December 23, 2011

Homemade Christmas Gifts - Part 2

MOMMY: if you are reading this, I advice you to stop...it will spoil the surprise!


Yesterday I shared the Wooden Pictures, "I Love You Because:" and Grandparent's Journal my husband and I created for several family members.

Today I'm excited to share my second most favourite handmade gift we made this year (remember: the plaid 'something' was my first!)


For this project, I used the following supplies:


- Wood Block (it's handy to have a husband who cuts and stains it for you - I just had to sand the edges a little!)
- Mod Podge
- Foam Brush
- Decorative Paper Scraps
- Photo (I had mine printed at a copy centre)


How To:


1.  Cut your wood blocks to your preferred size - mine are 5 in x 5 in.  You can stain them now if you like, and sand your edges/corners once it is dry (I like a bit of that worn look).

2.  Cut your paper to size.  As you can see, I left some of the wooden block showing around all my edges.

3.  Take your first strip of paper and apply a thin coat of Mod Podge to both the back of the paper, and the wood block.  Carefully lay the paper in place.

4.  Using your fingers, smooth out any air bubbles, and then run your finger along the edges of the paper to wipe away any excess.
5.  Repeat steps 2-4 for any other paper strips that you'd like to adhere, as well as for your photo.

6.  When you are finished, apply a thin coat of Mod Podge over the entire surface as a sealant.

Now make more (...8 in our case!) and give them all of your favourite friends and family.


As an alternative, you can use smaller blocks of wood, and various family photos to create these simple photo blocks:

I Mod Podged photos to both sides of the larger blocks to allow for some variety, and made these teeny "JOY" blocks for a bit of Christmas Cheer!  I went a little crazy and covered EACH side of the JOY cubes.  (Note to self: do not go this crazy next time.  It was very time consuming.)

Happy Crafting!


December 22, 2011

Homemade Christmas Gifts - Part 1

With Christmas just days away now, I have finally completed all of our handmade Christmas gifts!  I thought it would be fun to document some of our ("our," since handsome hubby has helped tremendously!) handmade gifts over today and tomorrow.

My favourite handmade gift was something I sewed for my future sister-in-law.  It has already been carefully wrapped; however, I will be sure to capture a photo of her modeling it for me (it's plaid!).

We drew names this year for all of the siblings/spouses in my husband's family.  There was a $30 minimum, so hubby and I both purchased something at that price for our "Secret Santa 'Giftees'" and then got a little creative with our time to create something extra.

For hubby's Secret Santa, I turned to my not-so-fancy sewing machine and repurposed a men's plaid shirt into something fun...(I'll return to that after Christmas.)


My Secret Santa LOVES hockey and especially the Toronto Maple Leafs (this is HIS obsession, not mine!)  The last year that the Leafs won the Stanley Cup was 1967, so I found some photos from newspapers at that time and transfered my images to wooden blocks using the method found here:

DIY Wooden Picture

Mine turned out like this:


I also made my Secret Santa an "I love you because" frame.  My husband and I really enjoy using ours.  (A few weeks ago he wrote: "I love you because: you don't have a 'nothing box'"  I'll explain another time!)  I found the idea via this blog and tweaked it a little with a fun font:

(Yes Julie, I promise to make you your own one day!)


For our grandparents, we made journal memory books.  I found my inspiration here: Grandparent's Journal, and then searched online for other various questions to build up my list of prompting questions.  While my book 'design' is not too fancy, I'm happy with the end result, and hope that our grandparents will be willing to record their thoughts on at least some of the questions!


I have had fun making some of our gifts this year.  I had considered making them ALL, but now two days away from Christmas, I am very happy I didn't!  (I really don't know where I would have found the time.)


(Tomorrow I will share the two different types of photo blocks we created for various family members.  I love how they turned out!)

LinkWithin

Related Posts Plugin for WordPress, Blogger...